PUREfit

Monday, September 27, 2010

FALL in Love with your local Farmers Market


Happy first days of fall!

There are some great things about summer, especially with regards to fruits and vegetables, but the end of warm weather doesn’t need to mean the start of a boring, bland diet with no variety. Never fear!

Some of the most flavorful and nutritious fruits and veggies are getting ready to come into season, and we all know that in season foods are higher in vitamins and minerals.

Take your meal planning to the next level with some of these delicious choices, full of fall color and flavor and guaranteed to satisfy. Visit your local Farmer's Market to stock up on amazing produce!
  • Apples – portable, packable and full of endless possibilities, apples are full of fiber and low in calories.There are literally hundreds of varieties available. Top whole grain waffles with sliced apples, or send them in a lunch box with peanut butter for dipping.
  • Pears – also full of fiber, pears have endless uses. Enjoy a Blue Cheese and Pear Salad to maximize the absorption of Vitamin C.
  • Acorn Squash – Known for its bright color and incredible storage time, Acorn Squash is enjoyable simply sliced in half and baked, but is also delicious stuffed.
  • Butternut Squash – A rich source of Vitamins A and C, Butternut Squash is delicious baked with a sprinkle of brown sugar or extra special in a White Bean Butternut Squash Ragout with Polenta Squares.
  • Pumpkin – most commonly known as the “Halloween Fruit”, pumpkin is full of beta carotene. Often found in pie, pumpkin can also be served in pancakes, muffins and even smoothies.
  • Sweet Potatoes – high in Vitamins A and C, sweet potatoes are delicious baked and topped with cinnamon, in baked fries or even as an ingredient in a healthy and delicious burger.
  • Broccoli – Available year round, Broccoli is at it’s best in the fall. Full of beta-carotene and Vitamin C, it is classified as a SuperFood. Delicious steamed and topped with lemon juice, it’s also a great addition to a salad and make for a great addition to a baked potato barRead more: Fall Produce is Amazing, Abundant and Delicious.
What is your favorite Fall Produce?

Total Body Ball Blast Workout


10-12 Reps
2-3 Circuits


1. Stability Ball Shoulder Press
sit on ball go up and down at same speed

2. Stability Ball Bicep Curl
roll forward go all the way up all the way down

3. Stability Ball 90/90 Roll
arms and lower body move at the same time, keep your back straight no collapsing

4. 3. Stability Ball 1 leg lunge
relax your back leg – use a stable object for support with 1 hand – engage glutes keep abs firm

5. Dumbbell Row on Stability Ball

1 hand on ball or 1 hand and leg – use your back to pull up the weight

6. Wall Squat
sit back into the ball and lower down with your glute muscles – keep your core firm

7. Stability Ball Russian Twist
keep feet down – lean slightly back – tap the ball side to side

8. Stability Ball Superman
keep head even with spine angle – let opposite arm and leg to parallel

9. Stability Ball Plank Roll In
Roll the ball in towards your stomach – keep but level

10. Seated Leg Extension
you can use an object for balance – slowly lift one leg at a time hold at the top

11. Stability Ball Bridges
Place feet on the ball – drive hips up and squeeze – don’t hyper extend

Saturday, September 25, 2010

Selecting "The Right Shoe"

Here is a helpful guide from The Running Room for selecting a running shoe.


Suggestions for Cushioning: Oasics Gel Nimbus 12, Nike Air Zoom Vomero+ 5

Suggestions for Stability: Saucony Pro Grid Hurricane 12, Oasics GT 2150, Brooks Adrenaline 12;

Suggestions for Pronation: Mizuno Wave Alchemy, Oasics Gel Formation 9, Brooks Beast & Ariel


Friday, September 24, 2010

Booty Boost

Here is a workout that Gabby Reece uses to tighten her glutes.


Who doesn’t like a firm backside? Besides looking good, it’s really important to strengthen your gluteus maximus (glutes)–it’s the largest muscle in the body. Every movement involves the glutes because it is in the center of the body. So, by tricking yourself into doing a workout to help lift or firm your glutes you are still working your entire body.

Before engaging in any exercise it’s important to get your glutes fired up and ready to work. As silly as it sounds, your butt gets sleepy with all of the sitting we do either at our desks or in the car. Sitting lengthens the glutes and hamstrings while the hip muscles become tight and shortened. So grab an exercise band and slip it around your legs, above the knees. Keeping your legs the same distance apart, do a little side step crab shuffle where you focus on engaging the glutes. Performing this short warmup before training gets the right muscles to work, and reinforces good movement patterns.

Once you’re warmed up, grab some dumbbells and a stability ball or chair and perform 2-3 sets of each of these exercises. Beginners should do 8-10 reps per set; intermediate-advanced aim for 12-15.


1. Half Jack – Glutes, Core
With feet firmly on floor, bend at waist, hands together in front of chest. Quickly hop out and back in repeatedly (like you would doing a jumping jack), moving only your legs. Keep your head and core stationary. Perform each rep quickly but gently.


2. Body Curl with Weight – Glutes, Core, Back, Quads
Stand in a lunge stance, right leg forward and right arm holding onto a chair back or wall for support. Hold a dumbbell in your left hand with your arm hanging down toward the floor. Lift the dumbbell back and up into a row; at the same time lift your knee up into your chest. Lower your leg and arm back down. Perform all reps on one side, then switch to your other arm and leg. That’s one set.


3. T Hinge with Weight – Glutes, Core
Place dumbbell in front of you on the floor. Stand on one leg, slowly bend your upper body forward while raising your lifted leg backward so you are in a T. Pick up the weight and raise back up to starting position. Lower back down slowly and place the weight on the ground before returning to the starting position. Repeat, then switch legs.


4. Elevated Reach to Sky Crunch – Glutes, Core
With your back on the floor, calves on ball or chair seat, hands clasped above head with straight arms, pulse your lower body up to the sky while engaging abs and glutes. Repeat.


5. Side Scissor with Weight – Glutes, Shoulders
Place dumbbell in left hand, right arm on a sturdy surface for support. Lift the left leg up and lightly pulse your left arm and leg toward each other in a scissor-like motion. Perform all reps and then switch sides.


6. Supported Karate Kick with Weight – Glutes, Shoulders
Place right arm on a sturdy surface for support. Raise left arm (with dumbbell) to side and curl hand toward the chest. Bend the left leg and lift to the side. This is the starting position. Kick your arm and leg out to an extended position then return to start. Perform all reps on one side then switch sides.


7. Squat Pick Up – Glutes, Hamstrings, Shoulders
Place two dumbbells a few inches in front of feet. Squat down and pick up dumbbell in front of OPPOSITE foot. Stand back up before squatting to pick up the other dumbbell. Return dumbbells to the floor one at a time with a squat in between.

Thursday, September 23, 2010

Running with Perfect Form

The Perfect Form
Running better, from head to toe.
By Jane Unger Hahn From the August 2004 issue of Runner's World
Head Tilt How you hold your head is key to overall posture, which determines how efficiently you run. Let your gaze guide you. Look ahead naturally, not down at your feet, and scan the horizon. This will straighten your neck and back, and bring them into alignment. Don't allow your chin to jut out.

Shoulders Shoulders play an important role in keeping your upper body relaxed while you run, which is critical to maintaining efficient running posture. For optimum performance, your shoulders should be low and loose, not high and tight. As you tire on a run, don't let them creep up toward your ears. If they do, shake them out to release the tension. Your shoulders also need to remain level and shouldn't dip from side to side with each stride.

Arms Even though running is primarily a lower-body activity, your arms aren't just along for the ride. Your hands control the tension in your upper body, while your arm swing works in conjunction with your leg stride to drive you forward. Keep your hands in an unclenched fist, with your fingers lightly touching your palms. Imagine yourself trying to carry a potato chip in each hand without crushing it. Your arms should swing mostly forward and back, not across your body,between waist and lower-chest level. Your elbows should be bent at about a 90-degree angle. When you feel your fists clenching or your forearms tensing, drop your arms to your sides and shake them out for a few seconds to release the tension.

Torso The position of your torso while running is affected by the position of your head and shoulders. With your head up and looking ahead and your shoulders low and loose, your torso and back naturally straighten to allow you to run in an efficient, upright position that promotes optimal lung capacity and stride length. Many track coaches describe this ideal torso position as "running tall" and it means you need to stretch yourself up to your full height with your back comfortably straight. If you start to slouch during a run take a deep breath and feel yourself naturally straighten. As you exhale simply maintain that upright position.

Hips Your hips are your center of gravity, so they're key to good running posture. The proper position of your torso while running helps to ensure your hips will also be in the ideal position. With your torso and back comfortably upright and straight, your hips naturally fall into proper alignment--pointing you straight ahead. If you allow your torso to hunch over or lean too far forward during a run, your pelvis will tilt forward as well, which can put pressure on your lower back and throw the rest of your lower body out of alignment. When trying to gauge the position of your hips, think of your pelvis as a bowl filled with marbles, then try not to spill the marbles by tilting the bowl.

Legs/Stride While sprinters need to lift their knees high to achieve maximum leg power, distance runners don't need such an exaggerated knee lift--it's simply too hard to sustain for any length of time. Instead, efficient endurance running requires just a slight knee lift, a quick leg turnover, and a short stride. Together, these will facilitate fluid forward movement instead of diverting (and wasting) energy. When running with the proper stride length, your feet should land directly underneath your body. As your foot strikes the ground, your knee should be slightly flexed so that it can bend naturally on impact. If your lower leg (below the knee) extends out in front of your body, your stride is too long.

Ankles/Feet To run well, you need to push off the ground with maximum force. With each step, your foot should hit the ground lightly--landing between your heel and midfoot--then quickly roll forward. Keep your ankle flexed as your foot rolls forward to create more force for push-off. As you roll onto your toes, try to spring off the ground. You should feel your calf muscles propelling you forward on each step. Your feet should not slap loudly as they hit the ground. Good running is springy and quiet.

Monday, September 20, 2010

Baked Yam and Cranberry Chicken Salad

Baked Yam and Cranberry Chicken Salad

Makes 1 salad

This is a great pre-workout meal. 
There is enough carbs to give you the fuel to push threw your workout yet calorie friendly. The fibre will keep you satisfied but not overly full that you feel as thou there is a lump of coal in your tummy!

Ingredients:

3 cups chopped romaine lettuce
1/4 cup diced celery
1/4 cup sliced red pepper
1/4 cup sliced green pepper
1/4 cup sliced red onion
3/4 cup cubed baked butternut squash
4 oz cooked and cubed chicken breast
2 tablespoons Craisins
2 tablespoons Maple Grove Farms Cranberry Balsamic Vinegar Dressing

Directions:

First, cube entire squash and toss with balsamic vinegar, a little agave, and chili powder. Bake in a 425 oven for 15 minutes. Turn. Bake another 15 minutes. Remove from oven to cool.

Chop romaine, celery, and peppers. Place romaine and celery in a bowl.

Saute sliced red onions and green and red peppers in pan for 5-10 minutes. Add to salad bowl. Top with 3/4 cup squash, cranberries, and cooked chicken.

Drizzle with cranberry dressing.

Nutrition:

Calories 407
Calories from Fat 14.4
Total Fat 1.6g
Saturated Fat 0g
Cholesterol 70mg
Sodium 343.07mg
Total Carbohydrate 71.42g
Dietary Fiber 14.2g
Sugars 30.17g
Protein 38.05g

Sunday, September 19, 2010

Coconut Curry Salmon with Quinoa

Post-exercise high protein

Coconut Curry Salmon with Quinoa
Serves four

4 salmon fillets

2 Tbsp vegetable oil

Salt and pepper

1 can light coconut milk

1 tsp mild or hot curry paste, according to taste

2 tsp lime juice

2 tsp brown sugar

2 tsp soy sauce

1 cup chopped mango

3/4 cup chopped cilantro

1 cup quinoa

Brush salmon fillets with oil; sprinkle with salt and pepper and bake at 375 F for about 15
minutes, until cooked through.

In a saucepan, combine coconut milk, curry, lime juice, brown sugar and soy sauce. Bring to a
boil and simmer until thickened. In saucepan, cook quinoa according to package directions.

Add cilantro to milk mixture. Place cooked salmon over quinoa and pour coconut milk over. Top
with chopped mango.

Per serving: 519 kcal, 41 g carbohydrate, 23 g fat, 12 g saturated fat, 53 mg cholesterol, 38 g
protein, 4 g fibre, 7 g sugar, 1.1 g omega-6 fatty acids, 0.4 g omega-3 fatty acids, vitamin C 27%,

Saturday, September 18, 2010

Black Bean Soup

Mexican Black Bean Soup with Lime and Cilantro
 
2 teaspoons olive oil
2 medium onions, chopped
4 medium garlic cloves, minced
1 small jalapeno chile, stemmed and minced (don't use the seeds)
1 tablespoon ground cumin
1 tablespoon chili powder
Salt
12-ounce bottle beer
(3) 15-ounce cans black beans*, drained and rinsed
2 tablespoons lime juice
Low fat yogurt
4 teaspoons minced fresh cilantro leaves

1. Heat oil in large saucepan. Add onions and sauté over medium heat until translucent, about 5 minutes. Stir in garlic and jalapeno and cook until garlic is golden, about 1 minute. Add a sprinkle of water if needed to keep from sticking.
 

2. Add cumin, chili powder, and salt to taste and cook, stirring frequently, until spices are fragrant, about 1 minute.
 

3. Pour beer and 1 cup water into pot. Bring mixture to a boil and simmer until alcohol aroma fades, about 3 minutes.
 

4. Add beans and bring mixture back to a boil.
 

5. Remove 2 cups of beans from pan and puree in a blender. Return to pan.
 

6. Stir in lime juice and salt to taste. Reheat if necessary.
 

7. Serve soup in bowls, swirl with yogurt, and sprinkle with cilantro.

Friday, September 17, 2010

What do I wear when the weather turns cold?

Q: I would like to continue working out and running outside, what should I be wearing?

A: The key to comfortable cold-weather running is to dress in layers. The air between the layers is what provides the warmth you feel. Generally speaking, the top half of your body needs three layers and the bottom half needs two layers to provide warmth.

During a rainy or snowy weather, the common outdoor wear is Gore-Tex. This material sheds water and allows perspiration wicked from your skin to pass through its outer shell.


 1. Base Layer:
This is by far the most important layer. If it's doing its job properly, this layer should keep you both warm and dry. Look for form-fitting long-sleeve shirts and long underwear made of technical fabrics that wick moisture and allow for evaporation. Cotton is definitely out for this layer as it holds moisture. Remember "cotton is rotton." Keeping warm in the winter means staying dry.
Look for products with: Compression and Thermal capabilities using materials like Polypropylene or Capilene


2. Thermal (Middle) Layer:
Not everyone will feel they need the added warmth, so this layer is optional. The recent development of Polar Fleece and Arctic Fleece have made this an additional layer for warmth and not weight, which may be a problem when wearing thick cottons and wools. Try not to defeat the purpose of your base layer by using nonwicking material. Arctic Fleece is a great example of the triple-layer fabrics that can act as your base and thermal layers in one.  Look for a vest, hoodie or a synthetic fleece jacket.
Look for products with: DryFit, Arctic or Polar Fleece


3. Outer Shell:
This layer is probably not a necessity every day, but definitely an asset on colder, windier days. A proper shell should prevent the winter wind from reaching your damp base layer as well as allowing moisture and some heat to escape from inside. A windproof, breathable shell is your best bet. Waterproof fabric is an added feature that will allow you to utilize your investment throughout the entire year.
Look for products with: WindPro, Power Shield, Fit-Wear


Activity Accessories. For your hands, use gloves or mittens as protection. Put on something such as a headband or a hat since up to 50-90% of your body heat is loss through your head. On your feet, athletic sport socks that wick moisture. To find these, try a running or sporting goods shop.

The following products will help keep you warm, dry and safe:
 
Balaclava, Thermal socks, Reflective materials or battery-powered lights, Reflective vest and a water bottle carrier.


Thursday, September 16, 2010

Quick Anywhere, Anytime Workout

Quick Travel Body Weight Workout:

Try to complete all 5 exercises in a row without resting (just
enough time to move from one exercise to another).

After you complete the entire circuit, rest 90 seconds to 3 minutes
seconds and then repeat the 5 exercises again. You can try this
circuit up to 4 times depending on whether you have 10-20 minutes
to exercise that day.


Exercise #1: T-Twist Push-Ups x 10-20 repetitions
(you can modify this without the push-up)


Exercise #2: Bulgarian Split Squats x 10-15 repetitions per leg
(you can hold onto a chair if needed for balance)


Exercise #3: Side Plank with Alternate Shoulder External Rotation x
20-30 repetitions
(this is great exercise to fire your postural muscles since it is
hard to target your back using just your own body weight)


Exercise #4: Prisoner Squats x 20 repetitions
(for a challenge or variety you could do a "pistol" or 1-legged squat for more
of a challenge)


Exercise #5: Mountain Climbers x 30 seconds
(this is a great "finishing move" to crank up the intensity and
your heart rate)


Tuesday, September 14, 2010

GET ON THE FITNESS WAGON IN 5 EASY STEPS

TRY THESE 5 THINGS TO GET ON THE FITNESS WAGON:

1. Get rid of processed wheat and refined sugar from your nutrition. Toss them out of your house. 

2. Drink WATER throughout your entire day and get rid of sugary drinks 

3. Eat more protein - lean meats such at chicken, fish, salmon, as well as other sources of protein such as soy and nuts 

4. Start by moving at least 3 days a week and increase the days as you start to gain momentum 

5. Change the way you "THINK" about food and your body. You don't treat your body by feeding it junk, you harm it. Feed it health.

Monday, September 13, 2010

The Super 30 Workout Challenge

This workout is dedicated to the number 30...this may or may not be my age *ahem*

WARM UP: 5 minutes of Dynamic movements ie. arm circles, marching, side shuffle, butt kicks, high knees, cross-overs, walking lunges.

PLEASE NOTE: a beginner should modify and only do one round. Remember to go at own pace and take breaks when needed.

You have 30 exercises to complete - back to back with as least rest possible - for 30 seconds...the major challenge is to do 3 rounds. If you do 3 rounds I give you permission to have a birthday cupcake with me!


1. Shadow boxing
2. Jumping jack (DB) press
3. Sumo squat with upright row
4. Burpee
5. Plank
6. DB Swing (front to side raise)
7. Squat jump
8. Spiderman push up
9. Bird-dog
10. 100m dash

WATER BREAK

11. Dive bomers (aka Hindhu pushups)
12. Wall Squat with Bicep Curl
13. Staggered Push ups
14. Knee's Up
15. Lunge (right) with Tricep Extension
16. Lunge (left) with Tricep Extension
17. Saxon bends
18. Mountain Climbers
19. Superman
20. Sucide shuttle run

WATER BREAK

21. Push up Plank
22. Heel Drop Sweepers
23. Side plank (right)
24. Side plank (left)
25. Skip (side to side; front and back)
26. Curtsy lunge
27. Hip Bridge
28. Bicycle crunch
29. Skater lunge
30. Inchworm

Cooldown - Speed walk 400m

Don't forget to Stretch!!!!

How to Minimize Water Retention and Bloating

Minimizing Water Retention
by Mark Macdonald, Creator and CEO of Venice Nutrition


Why does the body retain water?
Once the balance is lost, the body will need to make an internal adjustment in order to regain cell balance. Many times, the body adjusts by retaining water. The main reason for this is blood flow. Our circulatory system is the method in which our body is supplied with oxygen. Without water, our blood cannot flow. When there's a cell imbalance with possible dehydration (lack of water), the body triggers the release of hormones to retain and protect its remaining water and ensure the proper hydration of the body's blood supply.


What causes water retention?
This cell imbalance can be affected by many things; the most frequent are: high sodium and/or carbohydrate foods, a lack of water intake, the ingestion of diuretics (substances that force your body to release water), women's menstrual cycle and stress. 


Every gram of sodium and carbohydrates attract 3-4 water molecules. This means when you eat too much sodium or carbohydrates, you'll will force the body to retain excessive water. Many people also think that drinking water causes water retention... Not true. In fact, the exact opposite is true. Please remember that the body is a "feed as it goes" machine... If the body is being fed consistently, it will release consistently. This means by drinking more water, your body will release more water and in turn flush out excess sodium.  

Taking diuretics or "water pills" are also a big cause of water retention. These substances force the body to release its water and directly affects the sodium/potassium pump of each cell. By taking diuretics, your body begins to rely on them, and temporarily loses its ability to self regulate this internal water balance. This means that when the substances aren't taken, the body doesn't know how to release water, causing heavy water retention. Diuretics taken for long periods of time can cause permanent damage to the body's water regulating system as well as the kidneys. 

Another cause of water retention is a women's menstrual cycle. This is caused by the increased levels of hormones present. Typically, a woman on her menstrual cycle can gain 5-6 lbs. The last thing that frequently causes water retention is stress. Stress is defined as the body's reaction to change, producing a physical, mental, or emotional response. Stress naturally occurs in life, so in moderation it's a non-factor. When stress levels reach a high point, they cause a hormonal response that triggers the accumulation and retention of water and toxins in the body.

What are the effects of water retention?

Since we know the causes of water retention, what's the main effect? When the sodium/potassium pump goes out of balance, the main effect of water retention is weight gain. I've seen clients gain 10lbs of water by eating a heavy sodium/carbohydrate meal alongside a stressful few days. That same 10lbs will then disappear a couple days later by eating correctly and managing stress. In this circumstance, the increase of weight is just a sign of water retention and nothing else.


How do you minimize water retention and bloating?
It is important to understand and accept that there will be times when your body will retain water and get bloated. The goal is to implement the correct strategies to minimize the occurence of times like those. To achieve this goal, focus on these 4 strategies.


1. Drink Water
As I've shared, water is the most important ingredient in minimizing water retention. You should drink at least 64 oz (2 liters) of water per day, and ideally 96-128 oz (3-4 liters) per day. The best way to tell if you're drinking enough water is by the color of your urine. If it's clear you are doing well, if it's yellow, you're dehydrated and should increase your daily water intake.


2. Exercise Consistently
Movement equals optimal circulation. The more efficient and diverse you are with your exercise, the better your body can remove excess water. To learn more about exercise diversity, please read this article >>
 

3. Eat High Quality Foods
The ideal sodium/potassium ratio in mg is 1:3. The great news is that if you eat high quality foods, you'll automatically hit that ratio. It's pretty simple to tell the quality of a food, just look at its ingredient list. If it has 3 or less ingredients, it is of great quality. More ingredients means more processing, and that typically means higher sodium. A good rule is to center your meals on higher quality foods. This will ensure minimal water retention and bloating.
 

4. Manage Stress Levels
Stress causes the over release of the hormone cortisol. Cortisol is a water retaining, fat storing hormone. Managing your stress levels will help reduce water retention and bloating. To learn the 5 skills to manage stress please read this article >>


So the next time you step on that scale, if your socks leave an imprint in your legs (I hate that!), or your face looks fuller than normal, or your rings don't fit your fingers... I invite you to remember your new found understanding about water retention and bloating. If the cause of those things is an occasional "off plan" meal or a stressful day, it's just excess water. If you get back on track by implementing these 4 strategies that water retention will be gone in a day or two... there is never a need to panic once you understand the process.


To Read the Full Article go HERE

Sunday, September 12, 2010

Your Best Body Now: Look and Feel Fabulous at Any Age the Eat-Clean Way by Tosca Reno

The following is brought to you from Your Best Body Now: Look and Feel Fabulous at Any Age the Eat-Clean Way by Tosca Reno.


Some workout habits arise out of laziness, and some are downright dangerous. Check out the worst fitness mistakes you can make and the simple corrections that can help you stay focused.


1) FORM. I can’t say this enough . . . form is your safety net. Once you compromise the way you do the move, you’re no longer getting the greatest benefits from the exercise and you’re seriously increasing your risk of getting hurt. Even if it means lowering the amount of weight you are lifting, follow the correct form for the most outstanding results.

2) OVERTRAINING. I believe in staying motivated, but don’t expect that you’re going to dive right in and pound your body into its best shape ever overnight. Not only will this all-or-nothing attitude cause burnout, but you also risk injury and you will definitely give up on yourself because this is an unreasonable expectation. Instead, you’re going to gradually build up your muscles so they get the most effective, efficient workout possible. If you follow the Best Body Now program, more doesn’t always mean better, faster results. And remember, rest is good for your body. Take days off between training to repair and rebuild, or if you’re training daily, don’t work the same muscle groups back to back.

3) UNDERTRAINING. Once you’re dressed and ready to sweat, commit to giving it your all for the next thirty to sixty minutes. Just going through the motions doesn’t do anything for your body and makes it easy to let boredom creep in. You owe this time to yourself — you deserve it — so make sure you give it your all. As So You Think You Can Dance choreographer Debbie Allen says, “Put on your short stuff and sweat!” I like it!

4) DAYDREAMING. It’s so easy to let your mind wander while you’re lifting weights, but studies, such as those published in Athletic Insight and the Journal of Motor Behavior, have shown that when you’re completely focused on each rep, more muscle fibers are used. You can develop a laser-sharp focus by actively involving your mind in every set and rep, thinking about how your body moves, how the muscle engages, which muscle or muscles you’re using and correct form. This adds up to a better workout and faster results. So forget about the laundry, your kids’ schedules and your afternoon conference call, and stay 100 percent in the moment.

5) STAYING WITH A FEW EXERCISES YOU KNOW. Your muscles love being challenged, so if you just stick to the same routine, they’ll eventually adapt and won’t have to work as hard to do the same moves. But if you change the exercises and even the order you do them in, you ensure that muscles don’t get too efficient at any single routine. Not only is this better for toning, but it also helps your mind stay focused and engaged.

6) HOLDING YOUR BREATH. Regular steady breathing has many benefits, including keeping you from passing out. The upsides are that proper inhalations and exhalations can help you power through moves, keep lactic acid (a by-product that builds up in the muscles during exertion) at bay and help maintain a steady heart rate. A full breath delivers the maximum amount of oxygen to the blood, which in turn delivers more energy to the working muscles.
The above is an excerpt from the book Your Best Body Now: Look and Feel Fabulous at Any Age the Eat-Clean Way by Tosca Reno with Stacy Baker. The above excerpt is a digitally scanned reproduction of text from print. Although this excerpt has been proofread, occasional errors may appear due to the scanning process. Please refer to the finished book for accuracy.

Copyright © 2010 Tosca Reno with Stacy Baker, authors of Your Best Body Now: Look and Feel Fabulous at Any Age the Eat-Clean Way

Author Bios
Tosca Reno, B.Sc., B.Ed., author of Your Best Body Now: Look and Feel Fabulous at Any Age the Eat-Clean Way, is the bestselling author of the Eat-Clean Diet® book franchise, which has sold over a million copies worldwide. A magazine columnist and fitness model, she has spent the past decade putting her principle of health, fitness and wellness in motion in her own life, and sharing her proven plans with readers through her books, regular columns in Oxygen and Clean Eating® magazines and media appearances. She has appeared on Good Morning America, Fox & Friends, Extra and The Doctors, among others.

Visit her at www.ToscaReno.com and www.EatCleanDiet.com and follow her on Facebook and Twitter.

Stacy Baker, coauthor of Your Best Body Now: Look and Feel Fabulous at Any Age the Eat-Clean Way, is a health and fitness writer whose work has appeared in publications such as Self, Shape, Fitness, InStyle, Women’s Health, Family Circle, Prevention and more.

Saturday, September 11, 2010

Exercise and Stretch to Prevent Knee Injury

Many athletes and inactive people as well complain of knee pain. The symptoms and degree of knee pain can vary, but it is surely disturbing for everyone. The good news is that as common as it is, it is not inevitable. Even though the causes vary, there are some exercises that can help everybody prevent knee injury and pain. These exercises are also very useful for people who have already experienced or are experiencing knee pain. The exercises are actually even more recommended for them, since they are obviously prone to knee pain.


The most important thing you can do in order to protect your knee from injury is to strengthen the muscles that support the knee. This way your muscles will be better prepared to adequately support the knee joint or absorb the shock before it causes injury. Another important thing is to increase the flexibility of your muscles. That is why it is recommended to combine strengthening exercises with stretching knee exercises. This way your muscles will be strong, but not too tight, and flexible at the same time.

The main muscle groups that control the knee movement and stability are the quadriceps, which run along the front part of the thigh, and the hamstrings, which run the back of the thigh. The quadriceps has the function of extending the leg, so it is used when standing up, walking uphill or up the stairs and running. The hamstrings are used when bending the knee or pushing against something.

knee muscles


Knee Strengthening Exercises

Warm Up First. Five minutes of light aerobic exercise such as walking or riding a stationary bike to warm up the muscles helps to prevent injury.

Stretching or Strengthening Exercises First?
Muscles tend to be tight after strengthening exercises so stretching after strengthening exercise may be more beneficial than stretching first. However it is largely a matter of personal preference - stretching and strengthening exercises can also each be done on separate days if desired. Some people prefer to do stretches both before and after strengthening exercises. If you have knee problems or pain, consult a physical therapist for an exercise plan customized for your needs. Remember to warm up for 5 minutes to prepare your self for any type of exercise.

Keep Breathing throughout the exercises. Do not hold your breath.
How Often to do Knee Strengthening Exercises
In general, any strengthening exercises should only be done about every second day or three times per week on non-consecutive days to allow healing and to avoid overuse injury.

How Many Repetitions and Sets
If you are a beginner to exercise, start with five repetitions of each exercise - or less if the exercise is difficult. If you do not have post exercise pain, slowly add a couple of repetitions each week until you reach 10 - 15 repetitions. To increase endurance add a second set of 10 -15 repetitions after you can handle one set. When two sets because easy to do, you can add a third.

*NOTE: There are several strengthening exercises to choose from for some muscles. Choose one per exercise session.

Quadriceps Strengthening
Note: Only do one quad strengthening exercise per exercise session with the exception of the quad strengthening contractions, which can be done additionally.

Quad Strengthening Contractions:
Sit in chair. Move forward so that you are sitting at edge of chair. Extend legs, heels to floor. Keep knees straight (or as straight as possible if you have arthritis.) Tighten thigh muscles. Hold for count of 10. Relax for count of 3. Do 10 repetitions. You can do this several times throughout the day. You can build up to 2 or 3 sets of 10 repetitions at a time.


Quad Strengthening Leg lifts:
A simple exercise that will help strengthen the quadriceps consists of lying down and doing straight leg raises. Once you are in a good shape you can move to a more advanced level by doing the same exercise with weights. You don’t need any complicated equipment in order to do this. Just get an old bag, put a book in it and repeat the straight leg exercises. You can gradually add more weight to the bag.
straight leg raises

Lie flat on back. Bend left knee at 90-degree angle, keeping foot flat on floor. Keeping the right leg straight, slowly lift it until right foot is the height of the left knee. Hold for a count of 3. Repeat 10 times. Switch sides. Work up to 10 sets of 10 over several weeks.

Safety Tip:
Leg lifts: Lifting both legs at the same time causes excessive stress on your lower back so
only lift one leg at a time; the opposite leg should be kept slightly bent with foot on floor. 

Quad Strengthening Short-Arc Leg Extensions:
 

Sit or lie on floor. Place a rolled up towel under your thigh for support. Keep you leg straight and raise your foot about six inches off the floor. Hold for 5 seconds. Slowly lower your foot, bending your knee. Do 10 repetitions. Switch sides.

Quad Strengthening Knee Dips:

Stand with knees slightly flexed. Point your toes straight ahead.
Make sure your kneecaps are also pointed straight ahead.
Lift one leg up and balance on the other leg. Slowly lower yourself up and down ONLY a few inches. Keep the knee of the leg you are balancing on slightly flexed. Your knees must remain pointing straight forward. Do not let them turn inward. Stand straight, do not lean you body to one side. Do 10 dips. Switch sides.

If you feel pain in your knees, start with fewer dips.

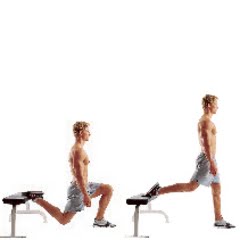
Quad Strengthening Partial Squats:

Stand. Keep back straight, knees hip-width apart and pointing straight ahead. Slowly lower and move your buttocks backward as if you were sitting in a chair (don't bend your knees beyond a 90-degree angle, if 90 degrees is too difficult bend even less). Hold position for a count of 5. Do ten squats. Stop if you feel pain in your knees. You may find it useful initially to do these against a wall sliding up and down - you can even progress with a physioball between you and the wall. Another modification is to place a chair underneath you so if your knees are weak you can just sit down.

Safety Tip: Make sure your knees do not extend beyond your toes when doing partial squats. Keeping your weight behind your knees reduces the pressure on the knee joint during the squat. Bending the knees beyond 90 degrees (a right angle) places excessive strain on the knee.

Hamstring Strengthening

Note: Only do one hamstring strengthening exercise on the same day.

Seated Hamstring Strengthening Contractions:
Sit in chair, with knees bent to 45 degrees and heels on floor (toes lifted up). Don't move heels but pull back on them, digging heels into floor. You will feel tension in you hamstrings. Hold for count of 5 - 10 seconds. Relax for count of 3. Do 10 repetitions.


Lying Hamstring Strengthening Contractions:

Lie on back, knees bent about 45 degrees. Dig heels into floor. You will feel tension in your hamstrings. Hold for count of 5 - 10 seconds. Relax for count of 3. Do 10 repetitions.

Hamstring Strengthening Curls:
Lie on stomach. Place left foot onto the back of the right heel. Slowly pull your right heel toward your buttocks - resisting with the left leg. This contracts the hamstrings. Hold for a count of 10. (Keep pressing your left foot and right heel against each other) Hold for a count of ten and relax for count of 3. Do 10 repetitions.

Walking backwards helps to develop the hamstrings. When walking backwards, your weight is distributed more evenly, resulting in less strain on your knees. 

Other Strengthening Exercises for Knee Stability

Hip Adductors (Inner Thigh) / groin muscle and inner quad muscle (VMO) Strengthening:

Sit in chair, put fist between knees, squeeze together knees. If you have a small medicine ball you can use this too. Hold for count of 10. Relax for count of 3. Do 10 repetitions.
Lie on floor on your right side, shoulder and hips aligned. Use your right hand to prop up your head. Place the left hand on floor in front of you to help balance yourself. Bend left leg and bring it to the floor in front of you. Slowly raise your right leg about 10 inches off the floor then, hold for a second, then slowly lower leg to ground. Lift 10 times on each side.

Hip Abductors (Outer Thigh) strengthening: 
 
Lie on floor on your right side, shoulder and hips aligned.
Bend right leg (leg on floor) to 90 degrees.
Slowly raise you left leg about 18 inches, hold for a second, then slowly lower leg.
Do 10 repetitions. Repeat on other side.

Glutes Strengthening Backward leg swing:

Hold onto back of chair for support. Swing leg back at a diagonal until you feel your buttocks tighten. Tense muscles as much as you can and swing leg back a couple more inches. Return leg to floor. Repeat 10 times.
Switch sides. Do 10 repetitions. Repeat on other side.

Stretching Knee Exercises

How Often to Stretch
In general, stretching exercises may be done daily but every second day or 3 times per week is enough. Stretching exercises are often prescribed twice per day or more by physical therapists for the treatment of knee pain, the specific exercises recommended depend on the cause of the pain.

How Long to Hold a Stretch
For stretching exercises, the stretch should generally be held for a total of about 60 to 90 seconds. Holding a stretch for 30 seconds only requires 2 or 3 repetitions. Some people prefer to do more repetitions of 5 or 10-second stretches or just one 60-second stretch.
WARM UP before stretching with 5-10 minutes of low-impact aerobics (e.g. walking, stationary bike). Warmed up muscles are more responsive to stretches and less likely to tear.

Stretches should be performed without any bouncing and in a slow & controlled fashion

Calf Muscles Stretch:

To stretch left calf muscle, step back with left leg, forward with right. Bend right knee (keep left leg and back in a straight line as you lean forward) until you feel a gentle stretch in the left calf. Do not roll foot out to side. Keep heel flat, foot forward. Hold 30 seconds. Repeat on other side.


Quad Muscle Stretch:
There a few ways to do this:


To stretch your quadriceps, stand. Bend right knee, grab front of right ankle and bring heel to buttocks with hand. Keep knees together. Do not arch back. Do not let leg go to side. Point knee toward floor. Tighten buttocks and tuck tailbone under to increase stretch.
Hold for 30 seconds. Repeat on other side. bring your heel to the hip with your hand, while keeping the knees together. Hold for 30 seconds.
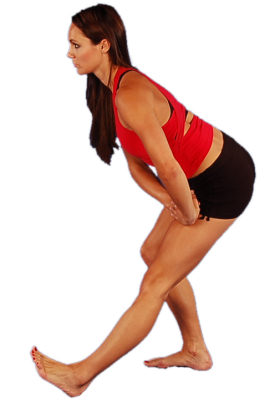
quadriceps stretch


Hamstring Stretch:

Standing position
Keep one leg on ground; put one foot on chair with leg straight. Bend forward at the hip. Hold for 30 seconds. Repeat on other side. *Do not attempt to touch your toes as this will stretch your back, and the goal of this exercise is to isolate your hamstring muscles in the leg that is being supported by the chair.

Sitting in chair hamstring: Straighten one leg, keeping heel on floor. Lean forward at hips, keeping back straight. Don't try to touch your toes. Hold for 30 seconds. Repeat on other side.

Iliotibial Band Stretch:

Standing position:
Stand up. To stretch the right side, cross right leg behind left leg. Bending from the hip, lean torso to the left - pushing hips to the right. The stretch is felt on the outer right hip and thigh. Keep right leg straight, left knee slightly bent. Hold for 30 seconds. Repeat on other side.

Sitting position:
Sit in chair or on floor. Bring right foot to outside of left leg, bringing knee towards opposite shoulder so that the knee crosses the midline of the body. Hold for 30 seconds. Repeat on other side.

Hip Adductors (Upper Inner Thigh) Stretch:

Standing: Step off to the side with the right leg. Bend left knee slightly (do not extend knee beyond toe) and move your right foot further to right until your feel a stretch in your right inner thigh. Hold stretch for 30 seconds. Repeat on other side.


Sitting position: Sit on floor, spread legs into a V position. Slowly lean forward from your hips, keeping your back straight, until you feel the stretch. Do not bounce. Then lean towards the right, foot then left foot. Hold for 30 seconds.

Hip Abductors (Upper Outer Thigh) Stretch:
Sit on the floor, legs extended in front of you.
Bend right leg and place right foot on floor on outside the left knee.
Twist upper body to right and use left elbow to gently push against outside of right knee until you feel a gentle stretch in the right hips, buttocks, and lower back.
Hold for 30 seconds. Repeat on other side.

Hip flexors (front of hips) Stretch:

Tightness in these muscles can affect the alignment of the knee bones.
Standing Exercise: Step forward with the right leg, bending right knee (to increase the stretch, take a larger step). Do not extend right knee past toes. Keep left knee slightly bent with heel off the ground. Keep back upright. This stretches the front of the hip on the left side. Push the left hip forward to increase the stretch.
Hold for 30 seconds. Repeat on other side.

Gluteal Stretch (back of hips / buttocks):


*Of all the above knee exercises, the quadriceps strengthening contraction is probably the easiest, safest and most important exercise you can do to prevent knee pain and injury. Those who have trouble fitting in exercises into their schedule can always do this exercise while watching television.